
How to make a workable musical instrument out of a stick, a guitar string, and an empty can.
Well, the weather here has been crappy for a while and I’ve been cooped up inside at my mobile home base camp waiting for someone to come and repair my leaky roof. To pass the time, I decided to work on a DIY project that I could do using materials I already had laying around.
The “canjo”, or homemade guitar, dates back in America at least to the mid-19th century, when musically-inclined people in poor rural areas like Appalachia or the Deep South would improvise instruments out of found materials. Many of these were based on traditional stringed instruments from West Africa, such as the Kora or the Akonting, which had been brought to the US by the slave trade. In America, canjos were made from things like gourds, cigar boxes, or tin cans. The single-string versions were usually made for children, while those who became adept often graduated to two-, three- or six-string versions. Many of the most famous blues guitarists got their start as a young kid plucking away on a single-string canjo.
A very simple but functional canjo can be made using nothing more than an empty soup can, a length of scrap wood, a few screws, and a thin wire or guitar string. If you are at all good at scrounging, you can probably make it for almost free—you’ve likely got most of the parts already lying around somewhere in your garage. And even if you buy all the components brand-new (a 1×2 board and some screws from Home Depot, a can of Campbells Chunky Soup, and a guitar string) it won’t be more than ten bucks. (There are canjo “kits” for sale on Amazon for $40-50, but it baffles me why anybody would pay that much for a can and a stick that they can scrounge up for nothing.)
Will it sound like a Martin D-28? Nope, it probably won’t. But can you play some rockin tunes on it? Yep, you sure can.
So, here is the process for a (very) basic canjo … (There is gonna be some jargon and some technical terms here, referring mostly to guitar parts—I hope the photos make it clear to non-guitarists what each name refers to).
The parts you will need to make this canjo:

The first step is to take your stick of wood (which will be your fret board) and measure up 25.5 inches from one end and mark it with a line. This is where your nut will go. My nut is made from a piece of quarter-inch wooden dowel that I found in a drawer that has been trimmed to the width of the stick (you can also use a length of pencil, or a metal bolt).
Then measure two inches beyond that point, to 27.5 inches. This will be where your tuning head goes. Cut your stick off at this point. This is now the neck of your canjo.
Now comes the trickiest part of the build. You want the tuning screw to be below the level of the nut. To do that, you must make a vertical cut just behind the nut, about halfway into the stick, then make a horizontal cut into the end of the stick to meet it. This will give you a notched stick and a piece that you have cut from it, like this:

Glue and screw this piece into place. Do not glue the dowel nut into place yet.

If you want to prettify your fret board by sanding it, staining it, or whatever, now is the time.
Next is the can (which serves as your resonator soundbox). My can needed a bit of preparation: it had a thin metal flange on the inside which I did not want to be rubbing against the string, so I grinded it down with a dremel tool:

Now mount the can onto the neck of your canjo. This is easiest if you select a can that has a raised lip running around the bottom. Drill a hole through this and drill another hole through the front lip, then insert screws through those holes to attach the can to the neck:

Most of the original canjos did not have any frets, and were usually played with a slide. I am going to compromise: I will have lines which mark the position of the frets, but will have no actual wires, so the fretboard will be smooth. Traditionally, single-string canjos were also usually fretted to a diatonic scale—this simply means that it does not have all the frets that a standard guitar does, but only has frets at the notes of the major scale—“do re mi fa so la ti do”.
Placing the frets involves a lot of math, which is in turn dependent on the distance between the bridge and the nut where the string vibrates. In this canjo, the bottom of the can serves as the bridge and our nut is set 25.5 inches from the bottom of the can. This allows us to calculate the theoretical distance down the neck, measured from the nut at the top, to each fret:
Fret position 1 is 2.833 inches 2 13/16”
Fret position 2 is 5.100 inches 5 3/16”
Fret position 3 is 6.375 inches 6 3/8”
Fret position 4 is 8.500 inches 8 1/2”
Fret position 5 is 10.200 inches 10 3/16”
Fret position 6 is 11.900 inches 11 7/8”
Fret position 7 is 12.750 inches 12 3/4”
Fret position 8 is 14.167 inches 14 3/16”
Fret position 9 is 15.300 inches 15 5/16”
Fret position 10 is 15.938 inches 15 15/16”
Fret position 11 is 17.000 inches 17”
So now you will want to measure out each of these and draw a thin line or at least a dot at that point. These will be your “frets”.

Then, once your frets are positioned, you need to string the canjo. I am using a plain ole nylon acoustic guitar string. (The treble strings will give a higher-pitched “banjo” sound, while the bass strings give a lower “guitar” sound. I am using one of the middle strings.) You can use a steel guitar string if you want, but it will make more tension on the structure and a twangier sound. Old-timers would use a length of baling wire for a string, or maybe a high-strength 50-60 pound monofilament fishing line.
Now you will want to drill a small hole through the bottom of the can, just big enough for the string to fit through, and you want to do this about a quarter-inch above the level of the fretboard. If you make it too low, the string may “buzz” against the bottom of the can or the fretboard, and if you make it too high, it may be difficult to fret the string with your fingers. You want the string to run evenly in height from the hole you have drilled in the can all the way along the fretboard up to the nut at the end. Insert the string through the hole and pull it through the can until the little ball at the end of the string is pressed up against the bottom of the can:

Now, run the string along the fretboard up to the tuning head. Drill a small hole in the middle of the tuning head and insert a small eyescrew. Now, take the end of the guitar string and insert it through the eyescrew and, looping it down along the screw post, turn it a few times, taking care that several of these turns cover the loop of the string and hold it into place. Trim off the excess string.

Now you can continue to tighten the eyescrew, which in turn tightens the string. Keep testing the tension and tone of the string as it tightens, until you get a nice tight string that makes a good crisp “twang”. Use your finger to press it against the fret board at various places and check the sound. It should give a nice clear tone without any buzz. Once you get the sound that you want, you can run a thin bead of glue along both sides of the dowel nut to lock it into place.
If you get a lot of buzzing or vibration, it probably means that your string is too close to the fretboard. Loosen the eyescrew, take the string out, and try again with a bigger dowel nut and/or by drilling the hole a little higher in the bottom of the can.
When you first put the string on, it will stretch a bit over time, so you’ll need to tighten it a few times afterwards till it catches. When everything has settled down, you can fine tune the fretboard. Some of the dots or thin lines you made before may be out of tune by a bit, so adjust their position as necessary. When all the frets and notes are correct (you should be able to run down the fretboard starting from an open string and hear the “do re mi fa so la ti do”), draw them in with a thick magic-marker line.
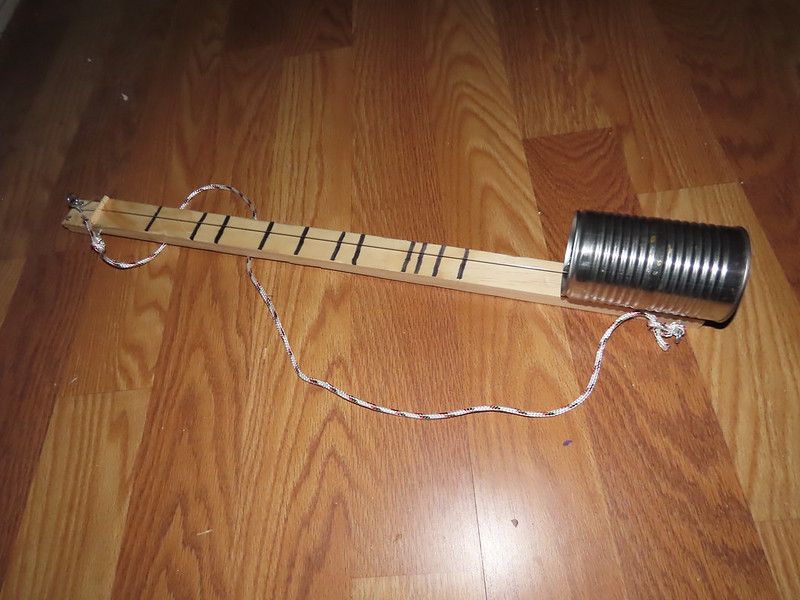
It is difficult to fret the string with one hand while plucking it with the other and holding the canjo at the same time. So you may want to add a “strap”. This can be improvised by inserting eyescrews into the side of the fretboard, one at each end, and tying a length of rope or paracord and adjusting to fit.
And the canjo is finished.
Playing the Canjo
Since the notes on the major scale are the same in relation to one another no matter what the pitch, we can use a standard “canjo tabulature” for playing songs. To do this, you want to discreetly label each of your frets, 1 to 11, in order, starting at the first fret after the nut. Tunes then can be written with the numbers corresponding to each fret per beat (with “0” meaning an open string with no frets pressed).
For instance, the folk Mardi Gras song “Iko Iko Onday” can be written in the form of:
5 4 4 2 5 4 4 2 0 0 2 2 2 1
My Grandma and your Grandma were sittin by the fire
3 3 3 1 1 3 3 3 1 1 1 4 4 3 1 2 0
My Grandma said to your Grandma “I’m gonna set your flag on fire”
5 4 2 4 0 4 0 0 0 2 2 2 1
Talkin bout hey now, hey now, Iko Iko Onday
3 3 3 3 1 3 3 1 4 4 4 3 1 0
Jokomo feenah ah nah nay, Jokomo feenah nay
And the most famous opening guitar rift in rock n roll history can be written as:
1-1 1-2-3 3-3-2-2-1 1-1 1-2-3 3-3-2-2-1
Although the frets only represent the major notes, all of the flats and minors are in there too in between—you just have to slide your fingers around a bit to find them. So the second most-famous opening guitar rift in rock n roll history can be written as:
1-3-4 1-3-4.5-4 1-3-4-3-1 (where “4.5” is about halfway between frets 4 and 5)
A quick Google will lead you to many songs that have had canjo tabulatures made for them. And with a bit of patience you can figure out the frets to use for many other songs and write your own tabs for them. So experiment with it, and have fun.
🙂

If you REALLY want to make it scream, you can electrify it by attaching a piezo-electric pickup to the can and adding a jack to the bottom. Plug in, turn that amp up, and shake the walls.
🙂